Painting Demonstration 1
I love sketching white phalaenopsis orchids in winter. They're beautiful and keep blooming for a month. There's something about having a flower blooming inside in the middle of winter. This white orchid sits on my hall table so I pass it constantly during the day. It always makes me smile!
Disclaimer: Jennifer Branch Gallery is a participant in the Amazon Services LLC Associates Program, an affiliate advertising program designed to provide a means for sites to earn advertising fees by advertising and linking to amazon.com. I receive a small rebate for your entire order (starting at 4%) if you choose to purchase through Amazon. Most items can be bought multiple places and I highly recommend local art stores if you have one! Any other recommendation links I receive no compensation for.
These referrals help me support this website, and I thank you for any purchase you make through them. I will never recommend a product I have not used frequently and believe is the best tool for the purpose!
Painting Demonstration 2
So naturally I had to sketch my orchid! One trick about sketching white flowers is always to place them against a dark background. How many famous white gardens are there that are best seen at dusk or dark? The dark makes whites luminous with any bit of light. Bright sunlight has so many highlights and white reflections you don't notice the white flowers. Use the garden trick to make the white flowers glow in your painting!
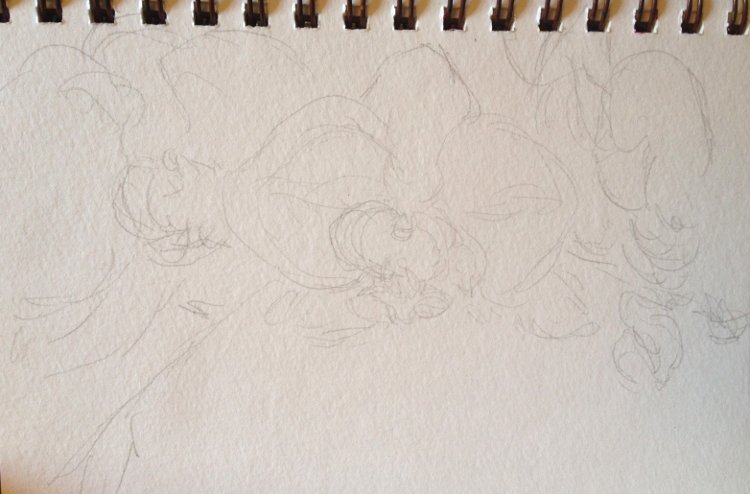
Start with a very light sketch. Remember, every mark will show with a white flower!

Painting Demonstration 3
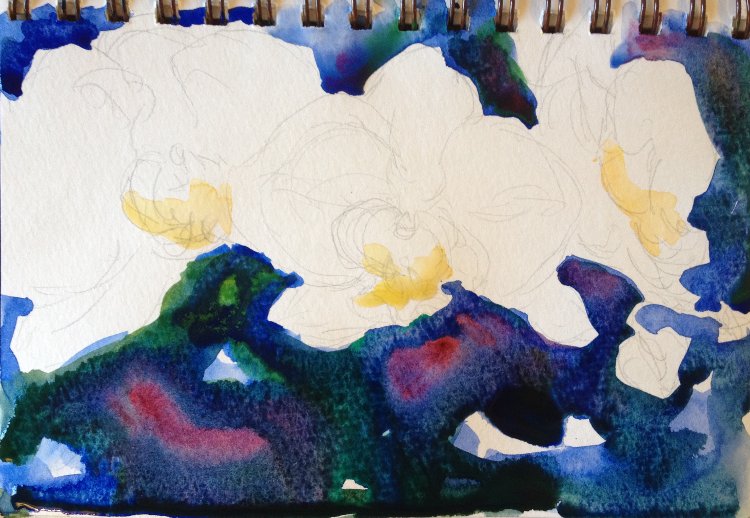
Next step is to start negative painting. I want the darks to be very bold, but not dull like most oil paintings. If I try to do the darks in one wash, they'll be dull. Instead I use a lot of pigment and a lot of water. I'll build up the darks in several layers, even in a little sketch. Remember, a wash will dry half as dark as when you paint it.
I paint just a tiny bit of the yellow inside the phalaenopsis. If I paint anything that touches that dark wash, it will bleed and be a huge mess. So stay away from the wash!
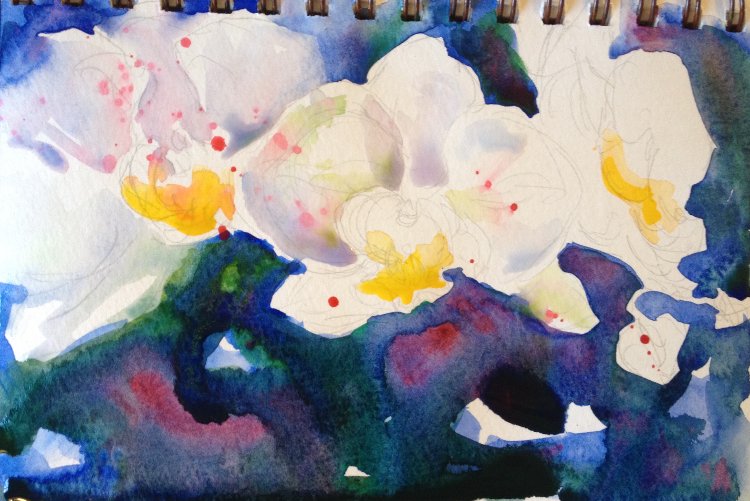
Artist Tips
If you ever feel like you're getting too serious and precise about a sketch, add some 1-2 colors of splatter paint, just a dash.If you're feeling wimpy, splatter with clear clean water. That will loosen you up and remind you that sketching is fun!
Painting Demonstration 4
Now that the first background wash has dried for a few minutes, I can start adding some definition to the white phalaenopsis. Notice how light the first wash has dried, it's looking almost faded compared to the luscious darks when it was wet!
I'm just carving out some basic shapes in the flowers, not adding much detail. Most of the shapes are added by pulling color from the background into the flowers with a clean wet brush. After all, while I want the flowers to stand out against the background, I want them to reflect it and have lost and found edges. If the orchids had more translucent petals I'd probably do this even more, but phalaenopsis have fairly thick petals that reflect more than they are transparent. I blur the orchid to the left more than the center flower. I don't want it to become the center of interest.
I add a little bit of splatter because this just isn't a serious painting, it's a sketch. If you ever feel like you're getting too serious and precise about a sketch, add some 1-2 colors of splatter paint, just a dash. If you're feeling wimpy, splatter with clear clean water. That will loosen you up and remind you that sketching is fun!
Painting Demonstration 5
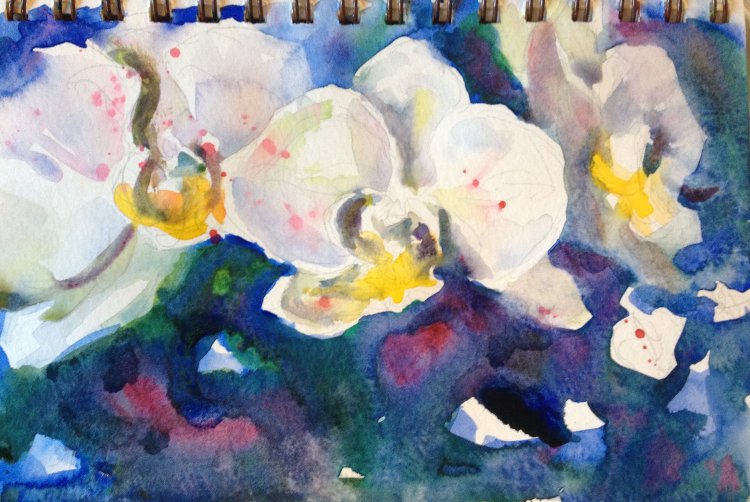
I add some shadows and detail around the orchid throat and lips. This is my center of interest so I want to make certain it has some detail. Remember to use colors for shadows that are in the background.White is lovely for reflected shadows.
Notice how the yellow shows up boldly because yellow is only in the orchid throat.
Painting Demonstration 6
One more wash of some luscious rich darks. I'm concentrating the color and the contrast around my center of interest and letting the color fade around the edges. Too much contrast will distract the viewer from where I want them to look. The background is still wet, notice how dark wet paint is.
I deepen the shadows around the orchid throat and lip a bit more. After all, this is my center of interest so I want it to have a bit more detail.
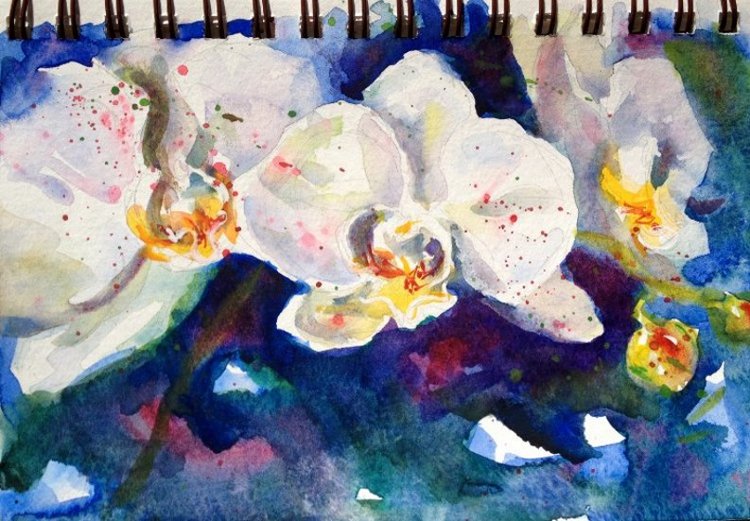
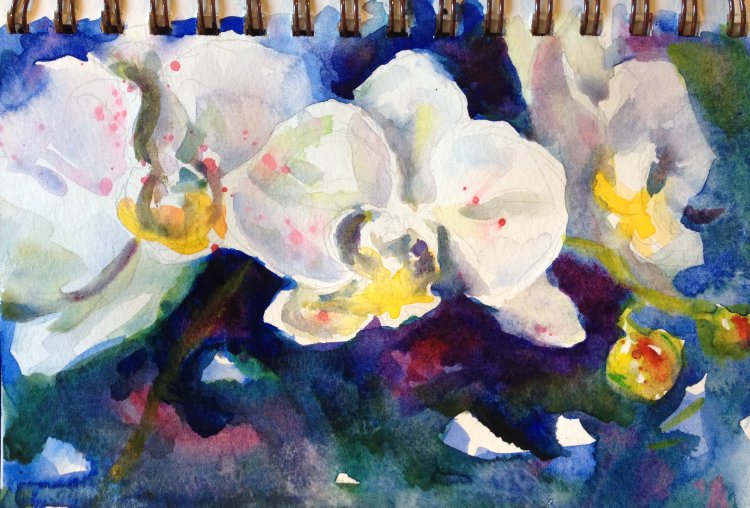
Final Watercolor Sketch!
I enjoyed sketching my phalaenopsis orchid. I have a very big weakness for painting white flowers. White flowers are all about transparency vs. translucency, reflection and shadows. So much fun to paint!
I hope this tutorial inspires you to enjoy an orchid this winter – and sketch it!

Related Art Lessons